How to open account?
You will get inside of the dashboard, now you can insert your personal profile, company profile, and business profile details.
How to import new Customer, Product or Service ?
If you want to add a new product, you can find these 3 buttons in the lower right corner, for product, customer, service, partner data
How to make templates?
Of curse, before making the first template, that it is necessary to fill in the company profile, personal profile, to insert some products and some customers.
In this Tutorial-Guide you will find:
- How to open an account on the Fastboss Platform?
- Set personal profile
- Set company profile
- Set Business profile
- Set Virtual Assistant profile, avatar, name, and voice?
- How to Use the dashboard and call Virtual Assistant?
- How to insert a new product, customer, service, partner data?
- How to make templates?
- How to delete my account on Fastboss?
- How to use Virtual Assistant on your smartphone?

How to open accounts on the Fastboss Platform?
- Click sign up on the left header menu, you will be redirected to the Fastboss sing up page> https://app.fastboss.ai/?redirect=register#/login
- Insert a Login name, password, email, and company name.
You will get inside the dashboard. Now you can insert your personal profile, company profile, and business profile details. These dates are important to teach your assistant about your business. Imagine that you are employing somebody now and you need to make some introductions about yourself, about the company and your business. Any employee will need to know this information before starting a job with you. So, the Fastboss virtual assistant will get introduced to your specific business details. The assistant will use this information to auto-fill in all the fields in the documents where you may be speaking about your company or business.
Your personal data will be used to get in touch with our customer support service to identify your account or reset the password.
Company data will be used by your assistant to make some marketing materials and presentations. Also, to fill in variables about your company info, name, address, or other details.
Business information will be used by the Virtual Assistant for a better understanding of your business requirements, specific or needs. And to better understand your target market and to easily identify your competitors. By these, your Assistant may clarify for you some recommendations from time to time and make assistance more useful than just document generating tasks.
If you don’t want to fulfill these fields right now, you may skip these steps and do this later, when you will feel the need.
Se here Video tutorial: https://youtu.be/d6TdyEAPIRc
Set personal profile
- If you already have registered your login details, then your personal profile may be accessed by the link: https://app.fastboss.ai/#/login, by accessing https://app.fastboss.ai/#/dashboard/settings, you may any time edit your personal and business profile.
- In your personal profile, you will find fields for name, surname, date of birth, street name, number, City, index (zip code), Country, State, email, alternative email, gender, Facebook profile, Twitter profile, LinkedIn profile. The mandatory fields are checked with *. To go on to the next steps for registration, you must fill in the mandatory fields.
Set company profile
In the company profile, the mandatory fields are starred (*). The details from these fields will be used to create business documents, and the Assistant will not ask you every time the information about your company.
The mandatory fields for your company profile are Name, email, phone, street, number, city, zip code, country, and your company bank account. Usually, the bank account number is used to create invoice templates, agreements, and bills.
Some information included here is useful to generate some marketing documents like license, certification, brand certificates, and copyright.
Others for juridical documents and official letters: company registration number, license, authorizations.
Set Virtual Assistant profile, avatar, name, and voice
It is nice to see daily a face you like, as your Personal Assistant. Also, maybe you are more likely to give your assistant a name to feel that it is a real person assisting you. That’s why we’ve created this tool, for your psychological comfort working with your robot assistant.


How to Use the dashboard and call the Virtual Assistant?
The dashboard is simple to use, in a few seconds after entering, you will see a short intro tutorial, and also on our site is available a video tutorial on the “How to” page.
The dashboard contains 2 vertical menus. On the left side are the classified data as Templates, Documents, Products, Services, Business, Customers, Partners, and Competitors. These classified data are included for general business needs, but you may use just a few of them. All this information is available for your assistant, and it will look inside them any time you need to find something for you. Therefore, your assistant will learn from these data tables and will look to help you find more customers, partners or to be aware of your competitor’s actions.
Products –
for the products you have in your company, we developed a special sector where you can insert all your goods for sale. In the next chapter, you will see how to work with this dashboard section. All your products are synchronized in a lifetime, and a new product introduced will be available also for mobile view. You may also use your mobile app to create a new product if you need to make it on the go.
How to insert a new product, customer, service, partner data?
- If you want to add a new product, you may find in the right bottom corner these 3 buttons
-
To add one product manually, choose ADD NEW button and then add a new product form will appear. After you fill every field, click SAVE, and also you may cancel.
For a better and faster import of all your products listed in an excel file, or a database, you may choose the IMPORT button, and the list with your products will be imported directly into the dashboard. Be careful about the table fields in the dashboard and in the CSV file to be the same consecutively, otherwise, the information will be confused. Be advised, that the SCV file must contain (,) separator, so when you export your excel files to CSV use (,) separator.
Also if you need to export a CSV file containing all your products, use the EXPORT.CSV button.
The same actions will be available for importing, adding a new service, or new customer.
- If you want to add a new service, you may find in the right bottom corner these 3 buttons.
-
To add one service manually, go to the service table to choose ADD NEW button, and then, below, a form will appear.
For a better and faster import of all your services listed in an excel file, or a database, you may choose the IMPORT CSV button (near the ADD NEW button), and all the lists containing your services will be imported directly into the dashboard. Be careful about the table fields in the dashboard and in the CSV file to be the same consecutively, otherwise, the information will be confused. Be advised, that the SCV file must contain (,) separator, so when you export your excel files to CSV use (,) separator.
The Customers
- If you want to add a new customer, you may find in the right bottom corner these 3 buttons.
-
To add one customer manually, go to the service table, choose ADD NEW button, and then, below, a form will appear. After you fill every field, click SAVE, and also you may cancel.
For a better and faster import of all your customers listed in an excel file, or a database, you may choose the IMPORT.CSV button (near the ADD NEW button) and all the list containing your customers will be imported directly into the dashboard. Be careful about the table fields in the dashboard and in the CSV file to be the same consecutively, otherwise, the information will be confused. Be advised, that the SCV file must contain (,) separator, so when you export your excel files to CSV use (,) separator.
-
You may choose the kind of customers – for instance, if they are B2B or B2P from the respective table. Even if your customer is B2P the steps described above, are also available for the B2P table.
Templates –
the templates are the first step when you need to preset some business docs. If you make a template for your routine business docs one time, next time, your assistant will use it to generate a certain document just with your smartphone. The variable included in your templates will form the dialog flow between you and your assistant. Using your voice, you may speak the content of the variables, and your assistant will write inside the template all the contents of each variable. If you cannot find your specific variable, you may use the variable [ANY_TEXT], [ANY_NUMBER], or [ANY_DATA]. If you think that this won’t help you, you may request a new variable from our team, and we will manage this request. More about Variables, you will see below: 10. How to make templates?
Documents – this is the stock file of your already made and used docs. It’s like your business document archive, where you have access anytime and anywhere from your smartphone. Our system is very flexible, and you may read and edit docs using your phone. The docs are opening very fast, and this is more than a cloud storage system. This is your secret file where you maintain all your know-how, financial docs, legal management, and marketing docs. Access to your business docs never was so easy. If you will need to search for a specific document to send to a certain customer, you will ask your assistant to do that. (this feature is in developing status).

How to build your templates?
Probably templates are the first important actions made on the Fastboss Dashboard.
Before making the first template, is necessary to fill in the company profile, personal profile, to insert some products and some customers. Otherwise, your assistant will tell you “You have no products yet, please create one or use an over template”. After you will complete these fields, the most important Variables will be clarified.
Actually, what is a template?
A template is a routine text document that may have an infinite number of text or pages and are more frequently used in your business life.
Examples of templates: Commercial offer, Sale agreement, Payment notification, Letter for the public organization, Invoice, Bills, Additional conditions for agreement or contracts, Formal Announce, Daily Report (or weekly), Daily Financial report, Requests, Technical Supervision Report, Technical Maintenance Report, Requests, Urgently request, Medical Emergency certificate, Inventory report, Stocks report…, in this list may be added any document you need to be filled outdoor when is very uncomfortable to keep your laptop or go back to the office for a document. For example, when you are in the car, on the agricultural field, on a building site, in the road helping with an emergency, medical service, in some exceptional situation, hurried, or simply in a business conference where you have no place for a laptop, and you have just your smartphone with you. More simple: any outdoor activity needing an instant document.
So, to start creating a template, click on “Templates “on the left side panel, and in the window, click Create New
This text editor is similar to any editors used, so it has the most important text editing tools.
Next, using a copy/paste function(Ctrl+C)/(Ctrl+V) you may insert your text here. You may copy the text from any document used before, and you can do it as a routine template document. If the parent document has some formatting, it is better to clear all formatting from the text before copying
After you paste the text, on the editor’s page, think what are the text variables. That means what you change from one situation to another situation. For example, it can be, the Customer name, customer address, product, price, discounts, etc. After you found all the variables, replace them with an appropriate variable from the right purple panel, just drag and drop them. If you don’t see the appropriate variable for your situation, scroll the panel down. If after that you can’t find the possible variable to use, please, use variable [ANY TEXT]-for text propositions, [ANY NUMBER]-for numbers and currency, [ANY DATA]=for data (day, month, year). Go till the end of your text and put all the variables that require this kind of document. After you finish, insert some keywords specific to this template. For example, if this document is a Sales agreement used for shoes, include in the keywords: shoes, agreement, sale – in the space under the title.
The title you may use the” Sales Agreement„. Save the template and check using it with your assistant to match some possible errors. You may edit the template if you found some mistakes and save it again. When you are sure everything was made correctly, you may use it on your phone next time. In this way, you can do any type of text documents.
Variables.
What are the variables? What are Personal, Universal, and Client variables?
The variable is some element, feature, or factor that is liable to vary or change. In our dashboard, the variables are words that are usually changing depending on your business needs, as are: Customer name, customer address, products, price, discounts, advance, etc.
Some of the variables are preset: Personal Variables. These are the fields that you filled in your personal or company profile. They are inserted automatically in the docs. Why did we include them? Because sometimes you will need to work with a template that someone from your team shared with you. In this case, the template will take your name, but not your team member’s name (or company name and contacts).
There are also Universal variables – like are data type [TODAY DATE], counter type [ISSUE NUMBER]. These variables are inserted automatically by the assistant depending on what date is today or what count number takes a specific document. The counter works consecutively. These variables don’t take the user’s influence.
The Client Variables are [CLIENT NAME], [CLIENT ADDRESS], [CLIENT PRODUCTS], and all the variables you think may use for your client identification.
If you keep your mouse over a specific variable, you may see arguments or comments to this variable, so you will understand better where to use it.
Documents –
this is the stock file of your already made and used docs. It’s like your business document archive, where you have access anytime and anywhere from your smartphone. Our system is very flexible, and you may read and edit docs using your phone. The docs are opening very fast, and this is more than a cloud storage system. This is your secret file where you maintain all your know-how, financial docs, legal management, and marketing docs. Access to your business docs never was so easy. If you will need to search for a specific document to send to a certain customer, you will ask your assistant to do that. (this feature is in developing status).
Products – for the products you have in your company, we developed a special sector where you can insert all your goods for sale. In the next chapter, you will see how to work with this dashboard section. All your products are synchronized in a lifetime, and a new product introduced will be available also for mobile view. You may also use your mobile app to create a new product if you need to make it on the go.
If you want to add a new product, you may find in the right bottom corner these 3 buttons ADD NEW, IMPORT CSV AND EXPORT .CSV
To add one product manually, choose ADD NEW button and then add a new product form will appear. After you fill every field, click SAVE, and also you may cancel.
For a better and faster import of all your products listed in an excel file, or a database, you may choose the IMPORT button, and the list with your products will be imported directly into the dashboard. Be careful about the table fields in the dashboard and in the CSV file to be the same consecutively, otherwise, the information will be confused. Be advised, that the SCV file must contain (,) separator, so when you export your excel files to CSV use (,) separator.
Also if you need to export a CSV file containing all your products, use the EXPORT.CSV button.
The same actions will be available for importing, adding a new service, or new customer.
- If you want to add a new service, you may find in the right bottom corner these 3 buttons.
- To add one service manually DO THE SAME STEPS AS FOR PRODUCTS.
How to delete your Fastboss account
To permanently delete your Fastboss account, follow these steps:
Log in to your Fastboss account from your desktop.
Click on the settings button in the top right corner next to the language switcher and select the “Profile” option.
In the opened window, click on the “Billing” button.
Click on the “Suspend account” button.
Your data, documents, and all information created in your account will be stored on the Fastboss server for 6 months so that you can recover it if needed. After 6 months, your information will be automatically deleted from the server.
If you wish to delete your information immediately after suspending your account, please contact support using our contact form, on :https://fastboss.ai/fastboss_home/contact-info/If you no longer have access to your account but wish to resume your subscription and data, follow these steps:
Log in to your Fastboss account from your desktop.
Click on the settings button in the top right corner next to the language switcher and select the “Profile” option.
In the opened window, click on the “Billing” button.
Click on the “Renew account” button.
You will be directed to the checkout page to complete the subscription payment.
How to use Virtual Assistant on your smartphone?
The Fastboss App is available on AppStore and Google Play markets. To download it, go to our homepage https://fastboss.ai from your smartphone and click on the AppStore or Google Play icon. Or just search for it in AppStore or Google Play from the smartphone.
After installing the app on the phone, you will include your Login, email, and password. If you opened your account previously, in the dashboard you must insert the same login and password. If you don’t remember your password use the link below the login window to ask for a new password from the encryption system.
After successfully login in, you will see a short introduction and will be required to confirm your email. After email confirmation, refresh the App window, and you will go to the next step in your account.
Your assistant will make a short explanatory tour about the work process, and after, you may start using the app.
The app is made simple, intuitive, and user friendly. If you have some comments about some nonfunctional tools or something else to propose to improve it, feel free to share with us! Just write your feedback on our Customer support on [email protected].
Below are some short pieces of advice on how to use a mobile app.
To use a template on your smartphone, click on it, and your assistant will start the dialog flow.
- To create a customer- use creates a tab in the customer menu.
- To create a product from the phone -use the create tab in the product menu.
- To share a document -use the share icon.
- To edit a ready issued document- tap 2 times on the document.
- To speak to the assistant – allow the Fastboss App to use your microphone and keep the phone not far from your mouth.
- To check if your assistant understood you correctly- look on the desktop and see your dialog text. If it is ok, tap the checkmark.
Any other tools you will discover by the time.
Enjoy your Intelligent Virtual Assistant!
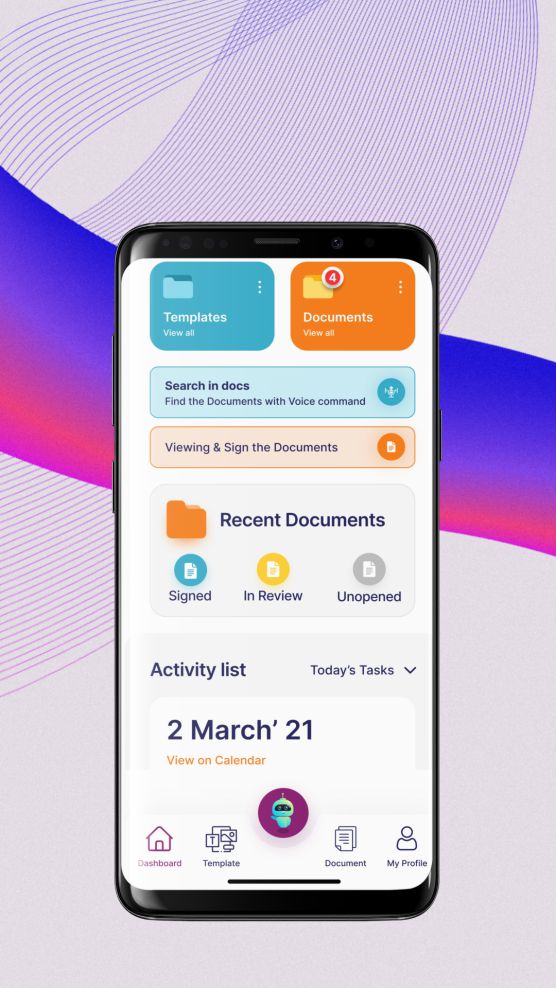
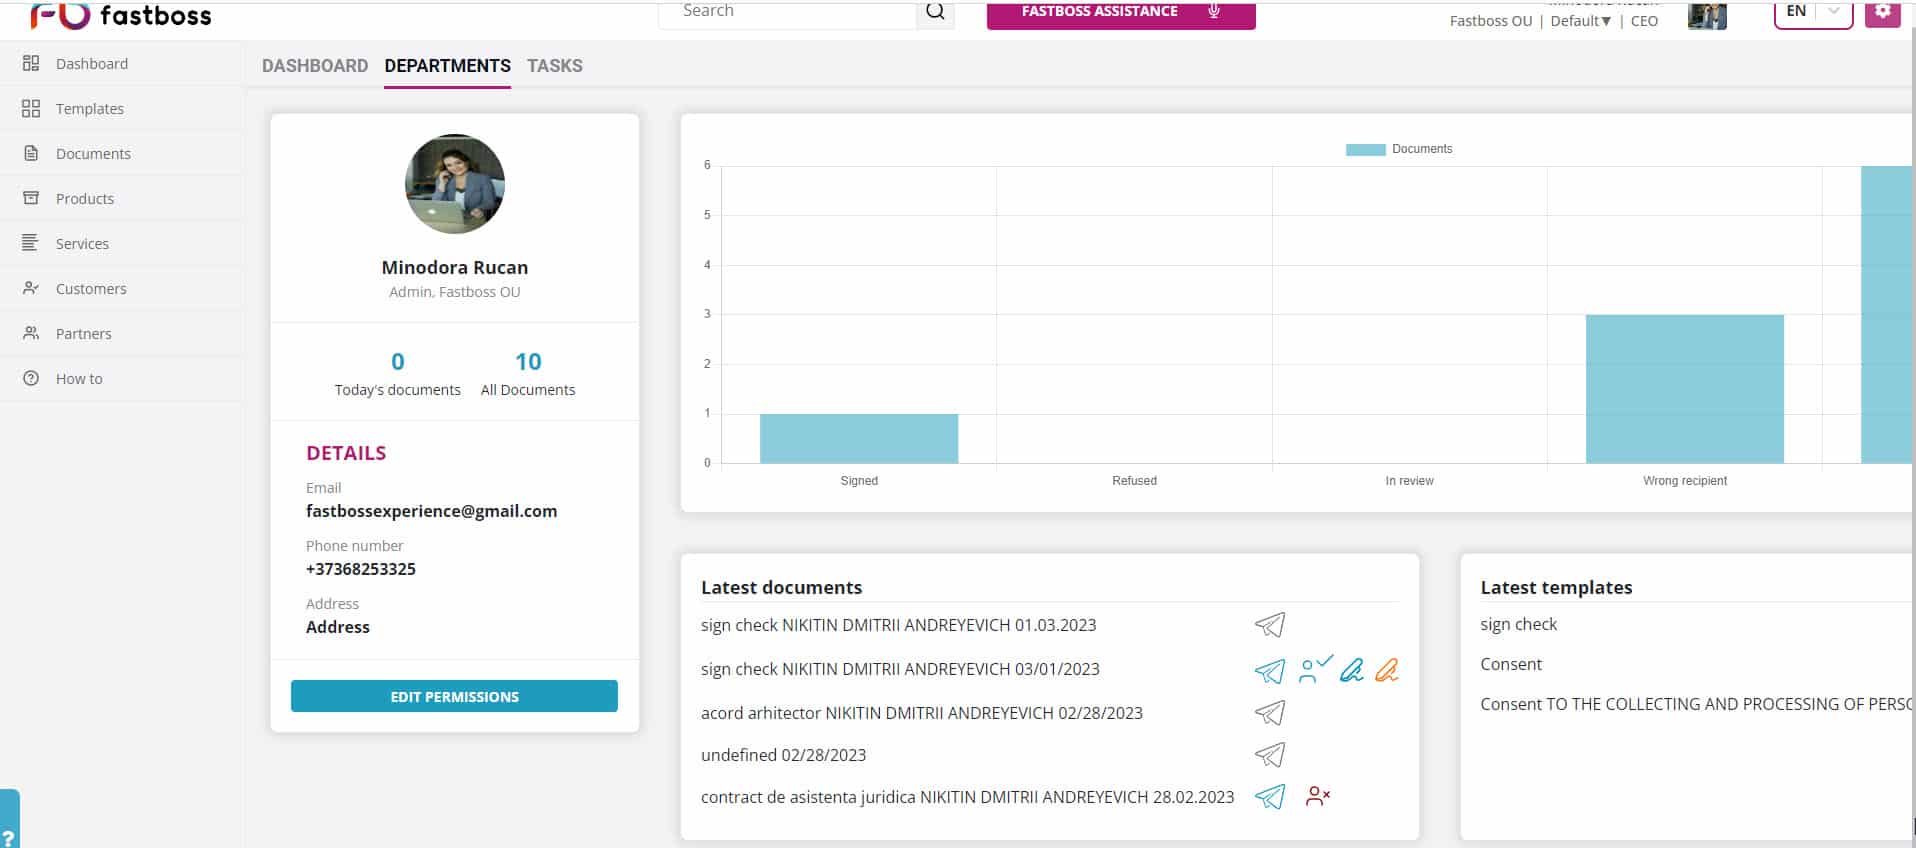
Dashboard and task management
All the features are on the dashboard. Documents, templates, advanced voice search, task management, document management. Anytime you need to view the document status: is it signed? viewed? or even opened? Check their status on the main dashboard. Need to find a specific document? Just use your voice and tell your assistant what you are looking for… For example: “Please find the documents with my customer Alison, where she bought a red car “.
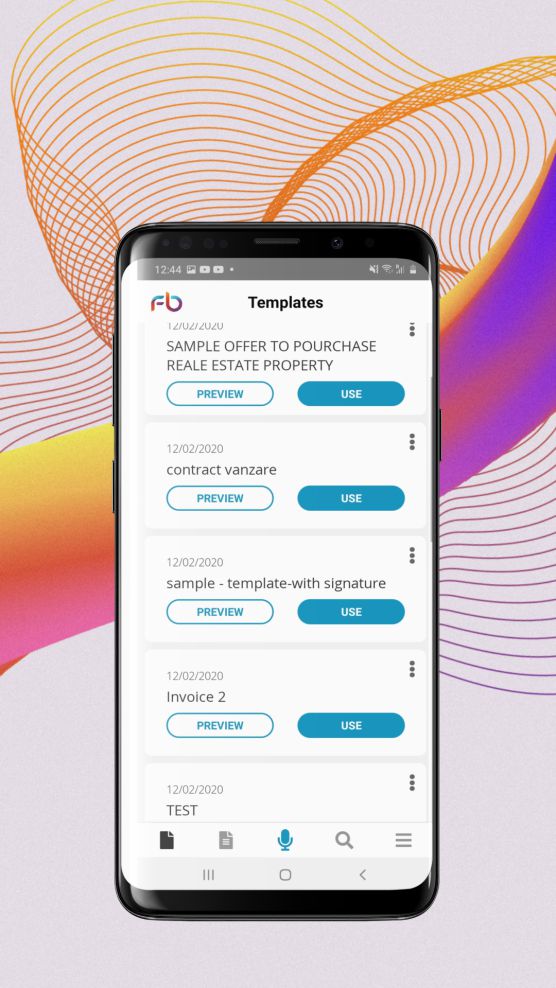
Easy made templates
After you logged in desktop version and build some templates, it’s very easy to use them instantly on your phone. If you are a newbie in your company, just ask some teammates to share a template premade and adapted to the company you work for. Your company store all the templates and documents in the Fastboss system cloud. You may share your templates and documents anytime using your phone.
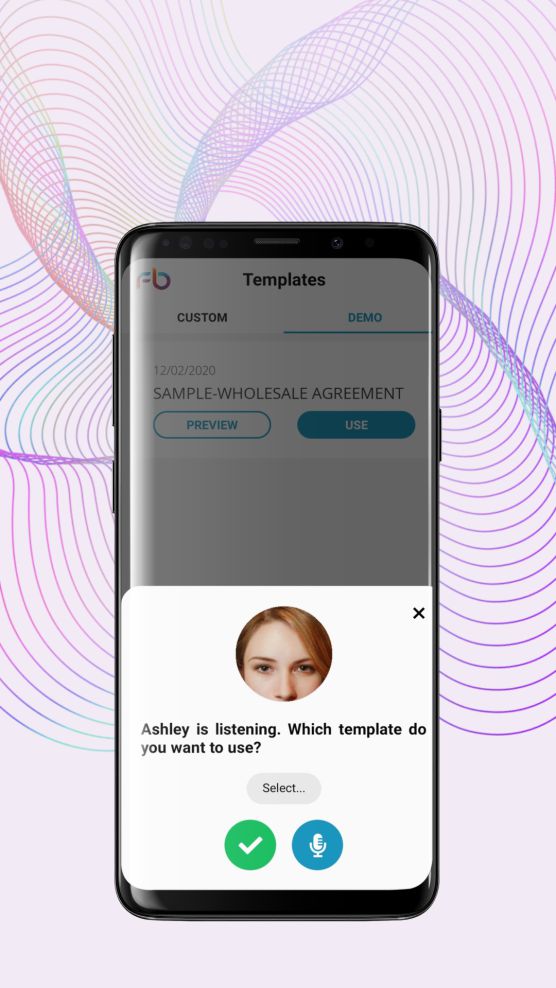
Fill in templates by Voice only
When you pick a template to fill in, your digital assistant, will come instantly to assist you and will ask, only what he/she doesn’t know. As: the Customer you are competing for or product you need to sell right now. The remaining variables will be autocompleted with the information you or your company included in the CRM and customer list. In this way, a long text with more than 20 fields to be completed will be ready in few seconds!
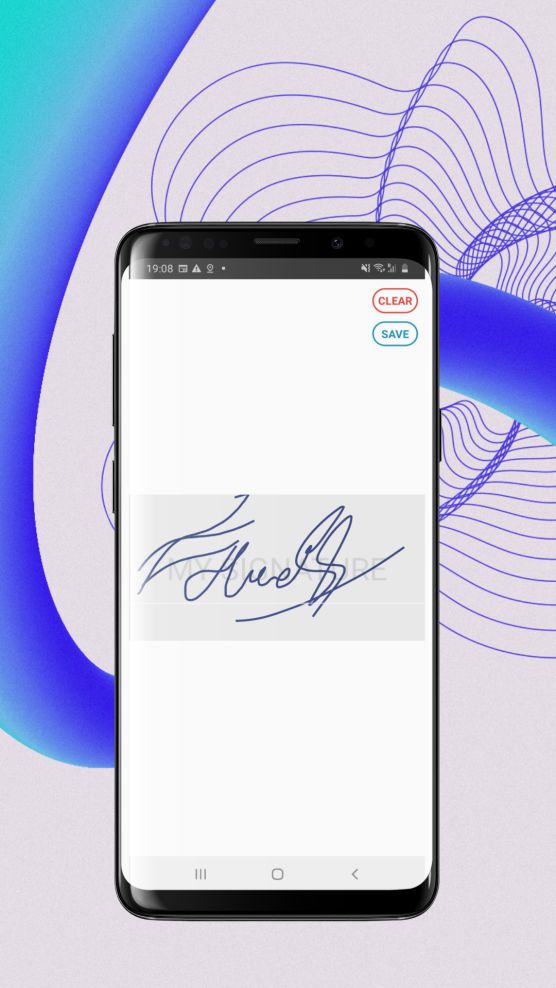
Pick signatures
After the document is completed by your assistant, and if you need to sign the document, your Assistant will open the signature taking frame, and ask you to sign. If your customer also needs to sign the doc, your assistant will ask to share the link with your customer. Your customer will receive a link that includes the document preview and signature taking frame. If your customer agrees to the document, may sign it. Anyway, your customer has 5 days to analyze the document details before putting the signature on it.

Fast and ready document to share
Finally, when all the parties have signed, the document is ready to be saved and shared with both. The signed documents include the signature report archived and connected to them. The report will reflect all the signing process details. All the documents are available to be viewed in PDF format from your phone. In this way, you have all your business information in your hands. And if you need to find some details in your documents just say it to your assistant!
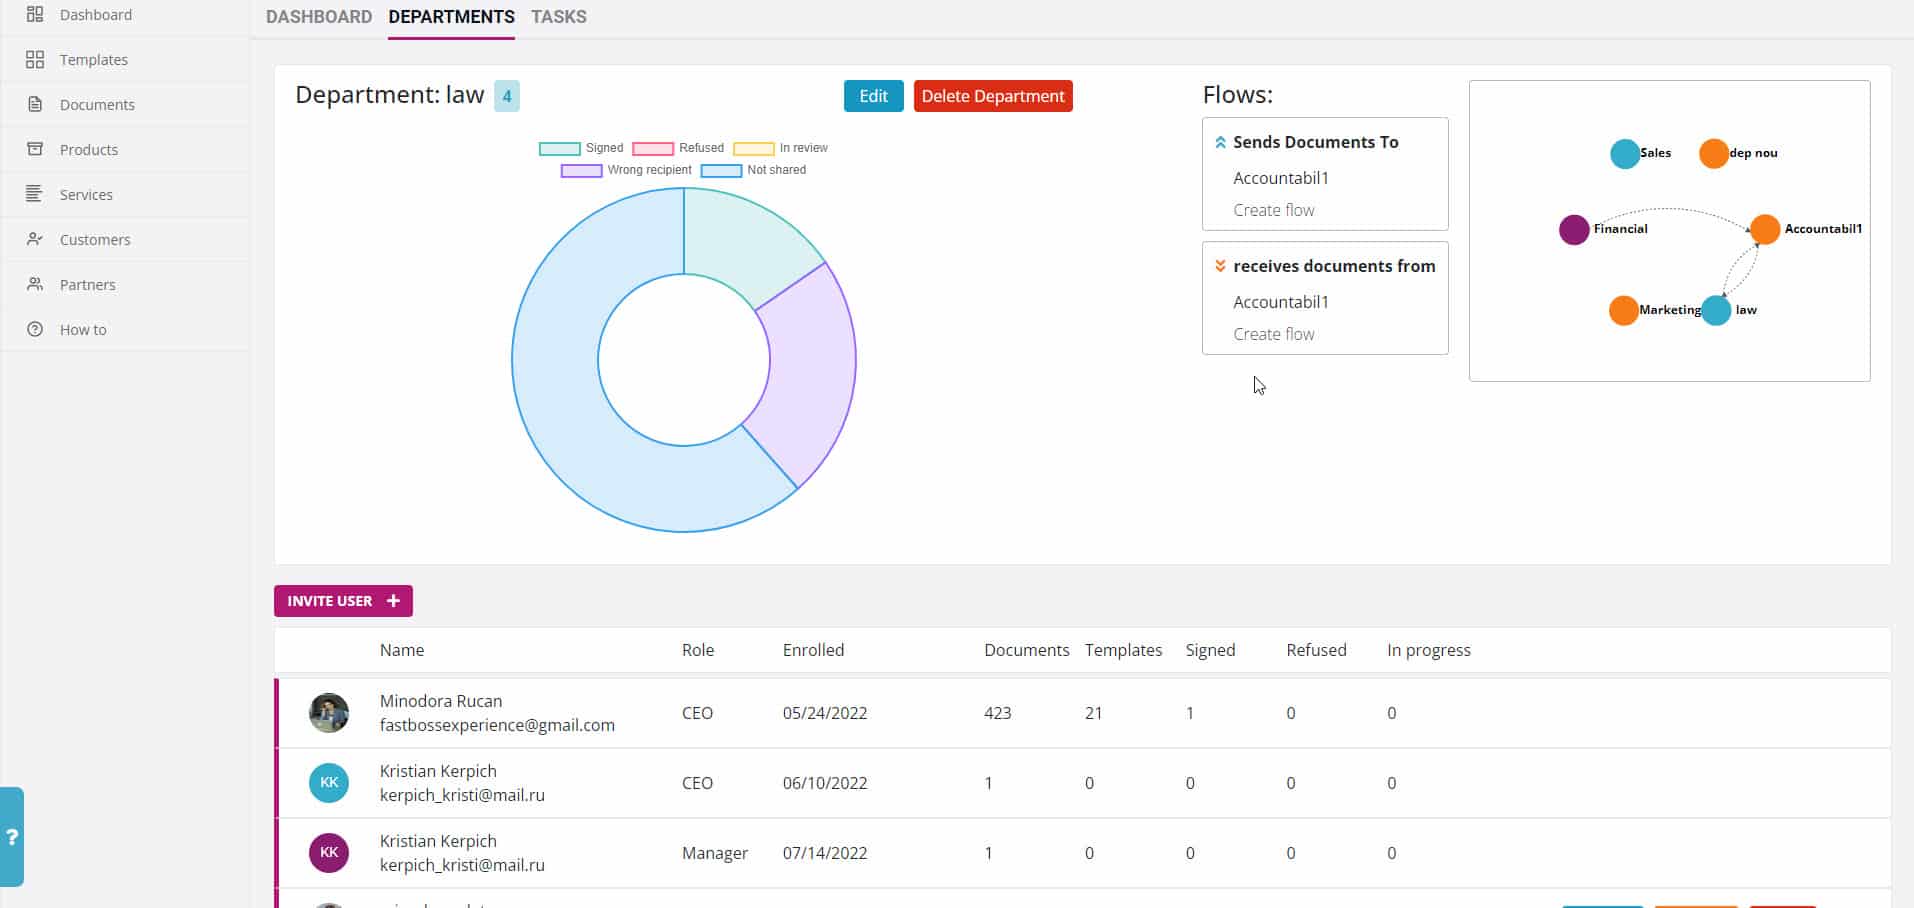
departments
employee performance chart
An easy to understand where your employees better works
Use it for free until 15 documents will be issued.
No Credit card required for registration.
Activate anytime, after the free trial is done.
It is better to start in the Desktop version.
Use this button to receive a text message to get the mobile version of Fastboss App available on your store.
The mobile app Fastboss is published on the AppStore and Google Play Market.


